Sunday, 14 December 2008

Take it to the bridge...

Another non-Sheehan entry - Trev is still sorting the final artwork that I'm missing on the Sheehan project, so in the mean time I've been putting together a quick P/J hybrid for Craig. It was supossed to be a quicky - grab a J neck, and throw it on my spare P body.

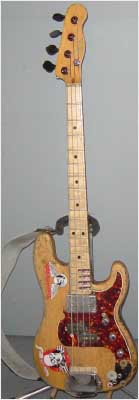
All was going well, I found a nice neck and the only work that needed done was to replace the low end logo with something more classy - a 70's fender precision. I sanded the old logo of, got a new logo and sprayed the two in laquer ready to go...

The next day when I went to apply the logo there was a disaster awaiting me - more white laquer!!!!!! the headstock was white and flaking, while the logo was a crusty mess. There was no option but to sand the headstock down, and start over (with a new waterslide logo - back to ebay...). AARRRGGHHHH!!!! Lots of swearing followed...

The problem of course was that to refinish the headstock I had to remove the machine heads. Normally you'd apply a logo before fitting them, but I was lucky enough to find a cheap neck with the tuners already attatched. As fitting the tuners on the last bass was a pain in the neck (lots of small screws), I was glad not to have that job. Now I had the worse job of getting them OUT.

Three out of the four screws on each tuner were no problem, but in each case one of them jammed, and stripped the screw head. More swearing was involved. Eventually I got two of the tuners off. The other two I dismantled in place, and was able to rotate them out of the way. 

Once that was done the refinish was easy. I sanded, then gave the headstock a couple of coats. Wait till the next day, and apply the waterslide. That was a bit tricky as the logo is much larger than the tele logo on the last bass, but it came out OK in the end. Then another overnight dry, before a whole load more coats.

The laqure dries pretty quick, so I only had to leave it a few more hours, and it was dry enough to drop the machine heads in, then bolt the whole thing together (nice and easy as everything was pre-drilled). Then all that was left was to string it up...

At that point I noticed a problem - the strings were off-center on the neck, and were only just over the pickups... The neck seemed pretty square, and the fact that the pickup is so far out means that the problem is probably the bridge. It looks like the bidge is about 5mm to low on the body!!!! Ouch. That's just a pain.

The options are to find a different bridge that lines up with the screw holes, redrill the screw holes, or just live with it.  The only way to decide is to play it and see:

Powering it up, it actually played pretty nice out of the box. The action is still settling in, but it felt really good for a first fit, and while the strings aren't over the pole pieces it didn't seem to affect the balance of the strings. The G string is nearer the edge than the E string but it doesn't really matter. I guess I'll live with if for a week or two and see how I feel.

Meanwhile I've been looking out for more parts. Bodies have been going for silly cash this week - a tanglewood body (like this one, but without hardware), that was described as badly needing stripped and refinished (it way worse condition) went for £45, when I got the loaded one for £23 a few weeks ago. However tonight I got a win... A Pink generic P Body - for £13 (including shipping). At one point it looked like I was going to get it for a penny + £10 shipping, but someone started bidding it up in minimum increments with 2 minutes to go. I was STRESSED watching the clock run out, but I got a great deal... remember the very first post in the blog (go back and check). I wanted to build Billy's PINK bass, and considered reworking a P body. Guess what I'm doing next!!! Well not quite - it's not going to be identical, so maybe I'll put a Jazz neck on!

Friday, 5 December 2008

All that Jazz...

Craig came round a few days ago. He tried "the bass" at the weekend and wanted me to do a setup on his bass! I guess he thinks I know what I'm doing (he hasn't read the blog obviously). It all went really well, and he went away happy with his bass a lot nicer than it arrive (I hope).

While he was here he noticed the spare body I bought and never used. His regular bass is a Fender Precision Special/Deluxe or something - basically a P body with a Jazz neck, and an extra Jazz pickup. All pretty standard parts, but not common when put together in that layout. He sugguested that if I put a Jazz neck on my spare P body he'd be interested in buying it. Well that sounds like fun!

Turns out Jazz necks are hard to find. Eveyone sells replacement P necks, but Jazz necks just don't exist. Fortunarly I found a cheap Westfield Jazz neck on ebay, and grabbed it. It arrived today, and looks great on the P body. I'm still waiting for a neck plate to fix it all together, but I can't wait to try it.

I also want to upgrade the pickup before passing it on. Last year I picked up an SD quarter pounder P pickup cheap from the US, but over the last few weeks the exchange rate has taken a dive, and the nice cheap american pickup is now 50% more than it cost me last year, so I think I'll look elsewhere. Top of the list is a "Tonerider". They'd nice and cheap, but reports are good. I guess I need to ask Craig if he wants to pay the extra for the pickup, or if he just wants to take it with the stock PU. It can wait until it's all put together anyway, so there's no rush to make that decision.

OK - that had NOTHING to do with the Sheehan bass, but it's pretty cool that someone played the "BS1", and was impressed enough to order a custom build from me!!! 

Tuesday, 2 December 2008

Live... in the heart of nowhere...

The bass did it's first gig! The band had a quiet gig out in the New Forest (at The Wheel - nice place, just to far from anywhere there are people. Especially at the end of November), so it was an ideal chance to try it out on a low key gig...

Well almost - a lot of people treked out just to see the gig. It was still quiet, but quiet a few of our regulars were there, and quickly noticed the change of equipment. One was the bass player for another local band, who gave it a quick spin, and was obviously impressed as he asked me who did the setup (huh? setup? I just threw something together!), so now I'm setting his bass up some time this week.

Sound wise it worked GREAT. I ran the line out from a baby marshall into one of the power-in's of my bass amp, and then to my 1x12", so I had a dirty channel for the P-pickup. However as the gig progressed I did realise that I was lacking a clean, or even edgy sound - the marshall only had one channel, so I had either the full "sheehan" sound, or just the EB, which is barely usable on it's own, as it's pretty much all bottom end - even mids are non-existant.

So, the bass itself was a great sucsess, but I need to figure out a decent amplification system. That was always the plan - the rig last week was just to get by.

My immediate idea was to replace the Marshall with something more flexable - I've got an old ART rackmount guitar fx unit that I'm definatly going to try, which would give me some fx on the P pickup, and channel switching on the distortion.

Plan B should work fine (and will make a nice mini-rig), but it's not the "FULL" solution, so I spent a couple of days trying to figure out an ultimate rig that I could put together with the minimum of new gear. I considered stuff like the Marshall 9004 pre amp, as I remember they were cheap when they came out, but apparently they're "vintage" now, and very rare.

Then it finally clicked!!! I'd been approaching it all wrong. I'd been considering the EB pickup, as "bass", and looking for ways of processing the new "lead" P pickup. In fact the P pickup is where the regular bass sound comes from, and the EB is what's new.

With that cracked I realised I already have a bass rig that can drive the P pickup - my Blue Thunder should be able to handle all the distorting I need, and it's fully programmable, so I can go clean, edgy or whatever I need. It also means that my main rig remains unchanged (handy for gigs with a different bass), and I just run the P through it. The trick is what to do with the EB!

Well all the EB really needs is a simple pre so it can feed into a power amp.  A little compression would be nice, and maybe some EQ. Looking around the SM Audio TB101 and TC01 look great (one has better compression, one has better EQ), though I don't know what they sound like. They're cheap, and have instrument inputs on the front! They also come in dual formats which might be nice (and makes racking them easier!). I've got an ART TubePac (in another rack - not used much, but I do like it there) which I'll use to try out the concept at the next gig, and if it works, them I'll grab something to use permanently.

Wednesday, 26 November 2008

It's HUGE!!!!!

Wednesday night is rehersal night, so it was time for the new bass's first semi-public outing... I'd been keeping it quiet until it was ready, but after a couple of days setup, it just needed to be played.

I ran the P-pickup through an old Sunn 15 watt guitar practise amp I've had for years (it's got a sticker on saying "do not use after Feb '93" on it!!!!), and I just threw that together with my Hartke kickback (the usuall practise rig). The results were awesome!!!! It sounded massive, even through the small rig. I just couldn't stop playing the trill intro to "addicted to that rush" - it just sounded instant "sheehan". It cut through, and it thundered just like you always wanted a bass to.

The guys were totally impressed - they both failed to spot my headstock reshape, and thought it was a real Tele', which is pretty cool. I'm under instruction to bring it on Friday to the gig, so having passed it's first test with flying colours, it's going to have an audience real soon.

There are still a few things to do. The winged ripper needs to go on, but I haven't printed it up yet. The plan is to get someone with a better printer to do it for me, so I don't screw it up. More signifigantly the fretboard needs scalloping, and the EB pickup needs its cover lowered a bit. The tone control on the EB isn't working quite right either, but I can live without it.

The big problem right now is how to turn tonights "baby rig" success into a full gig rig. I've got enough parts, but I'm not quite sure how to hook it all together to produce the full effect at gig volume (apparently a couple of Ampeg 8x10's works well...)

Saturday, 22 November 2008

It's Alive


The last few days have been so frustrating. The bass only needed another half hour or so, and it would "be" a bass - I just needed to finish the pilot holes in the neck, and bolt it together. FINALLY I found the time!!!!

It all bolted together without any real issues - but would it be aligned right? The only way to find out was to string it up. I just happened to have a set of rotosounds in the old pink box - seemed perfect, so on they went. While I was working I had iTunes on random play, and as the first string went on Merciless from the first Mr Big album kicked in... A Good Omen.

So? The strings line up on the neck perfectly!!!! I got the neck holes in exactly the right place!!!

With that done I added the string tree, and (even though I knew they'd have to come off  for tweaking) the knobs and bridge cover. The ripper and dragon sticker went on and we have an (almost) finished bass!!!

So how does it play? Well the action and intonation are exactly what you'd expect from a bass that's just been bolted together form parts - not even close, but the neck seems pretty true, so a good setup should sort things out. The neck feels fatter than I thought it would but it's nice having the almost bare wood. The body wood feels unfinished, even though it's thoroughly sealed. Plugging the two pickups into a two channel amp, and they sounded good. The EB is all bottom, and the P is thin and toppy (by comparison) which is great. Running the P through a random distortion pedal and the appeal of the dual system became instantly apparent. The P became this total lead sound, while the EB thundered underneath, with the option to roll between them as required - a pretty cool system, which will rock once I refine it a little.

Whats to do? Well setup is 90% of the work. I'm still missing a couple of stickers that I need to print myself, so they need to go on yet, but other than that we have an awesome bass...

edit: almost forgot - the top frets need scalloping.

Wednesday, 19 November 2008

Almost there...


All going well... The headstock was sprayed, an Telecaster logo applied, and a couple of extra layers of laquer applied, then on with the machine heads. The Hipshot d-tuner went on first... it's a tight fit, as there's a HUGE plate. I then struggled to get the regular machine heads to fit on next to it. I had to file down the edge of the A string tuner to fit it in. They're also at a slightly funny angle, as the place is right up against the edges of the headstock. It's a but quirky, but it's all fine. Those machine head screws are TINY. Had to make another trip to the hardware store to pick up a 1.5mm drill bit. I tried putting on one without a pilot hole and it was a disaster, but once I had the right drill the neck is finished and ready to go.

I also FINALLY got all the wiring sorted out (I hope). More dodgey pots and stuff made it a painfull couple of hours figuring out what was going wrong, and then it was a tight squeeze fitting it all in (the pickguard cutout for the P pickups is REALLY tight too, and needed a little enlarging), but it's all together.

All that's left to do is bolt the neck on. Its more or less drilled - just needs a slightly bigger pilot hole, and I can finally string this thing up...

Friday, 14 November 2008

The right way... and the left way!

D'oh! Tonight I figured I could grab 15 minutes, nip out to the studio and get a couple of quick tasks done. The first one went fine - a quick spray of laquer on the headstock. I decided to go for a more gloss finish here, and was able to give it a couple of coats as it drys within a few minutes (I hope! that's what the tin says). I masked of the fretboard, but I let some of the spray hit the back of the neck in the hope of getting a soft edge between the two area's - as if it's been worn down.

While that was drying between coats I figured I could hook up the controls to the pickups. They're all wired from the other night, so now the laquer on the body is dry, all I needed to do was solder the two halfs together, and the body would be done - 10 minutes...

A cool trick us to use a tuning fork - touch the pickup wires against a jack plug, then hold a ringing tuning fork over the pickup, and you check that it's all working - it was. I then wired the EB pickup to the controls, and put the jack in the socket. It worked (YEY!), but something was odd - the volume control worked backwards!!!!! Quiet where it should be loud, and loud where it should be quiet. That was just odd... Maybe I'd wired it backwards? But I was starting from a pre-wired Jazz control plate. Was it wrong? I rewired it the other way round, but the audio taper was wrong, so it just sounded awefull... Then it clicked... What if the plate I bought second hand on ebay) was from a LEFT handed bass? The controls would be reversed!!!!!! AAARRRGGGHHHH.

The plate was bought on ebay, and the seller had stripped a few instruments, and sold them on as parts. A quick check of "completed listings" found the culprate. Sold the same day as my control plate -  a left hand Jazz body. AAARRGGGHHHHH!!!!!!

It's not the end of the world. I got three nice knobs, and a jack socked for about what they're worth. I just need to get some new pots (and I had one anyway), so I'm only out a couple of £, but it's SO frustrating. The pickguard should be on by now, but instead I need to rewire the whole thing again.

D'oh!

Thursday, 13 November 2008

Enter Sandman...


Lots of little jobs getting ticked off now. I made it to the shops and picked up some sandpaper, so I was able to sand down the white area's of the body. Once they were clean, I gave them another wipe of oil. All looked good, so I gave the damaged areas another blast of matte laquer, and hopefully that's the body more or less done.

I'd previously done most of the headstock reshape, and was expecting to fine tune it and sand it. However following the first pass of sanding it started looking great, so I gave it a final pass of fine sanding, and a wipe of oil. The sanded area was lighter than the rest (which is stained a light yellow), so I tried a few things to darken it down - coffee, cocoa, and finally curry powder!! It's not a perfect match, but it looks pretty good, so I can live with it.

The Jazz control plate arrived, so I was able to wire up the control plate. While you might think that I'd be able to use the existing wiring (as a Jazz has to Vol's and a tone, just like we need), it turned out that to get the correct layout, and make it fit the long control layout I had to more or less completly dismantle it, and rewire it.  No biggy, it all went together great, and the nice shiny control knobs really look the part. Sheehans basses use (from front to back) V/T/V layout with the tone only affecting the EB pickup. It's a slightly odd layout (with the T in the middle), but makes more sense when you see this old photo of the bass, when it had FOUR controls. Clearly Billy added the new pickup, and added a new set of V/T controls for it, but at some point the P tone control was removed - perhaps when the stereo output was added?

On interesting thing I learned - Jazz controls wire their volume pots so that the pickup goes to the wiper, while P's use them in the more obvious pickup connected to the end, and output to the wiper. J's need to be that way because they have to pickups, and P's use a more obvious layout, but I wonder if there's any difference in the sound?

Anyway - the body is now finished, so it can go into final assembly. The neck is oiled, so just needs laquered, logo'd and the tuners attached...

It's so close!!!1

Tuesday, 11 November 2008

I can't think of anything

Time for an update, but I couldn't think of a clever title... So where are we:

Firstly the white laquer problem was worse than I though. There are a couple of moderatly large areas that needed attention. The worst of it flaked off easily, but a couple of patches need some sanding, and are proving quite stubborn. I need to go buy sandpaper to clean it down, and it may need a bit of a respray in some area's but it'll be OK.

While putting off a trip to the shops, I finally went for it and did the headstock. I traced the existing P shape into paper and cut it out, then drew and cut out a template for the new tele-style shape. It's not actually possible to get a true tele shape, as the circle at the end of the headstock forms a sharper angle on a P than it does in a Tele, so we're going to have the soft buldge of a tele, with the sharp edge to the circle of a P - no one will notice!

So once I was happy with the template I traced it onto the headstick (front and back) and attacked it from the rear with a jigsaw. It just about worked OK, but I had to finish the cuts with a small handsaw. I then used a file to get it down to around the right shape. It still needs sanding, and some final shaping, but it's pretty close, and pretty smooth so it's really just a finishing job from now on. It looks pretty good!

I've ordered a Jazz control set, as that gave me the three pots, knobs and cap that I needed for less than I could buy them. That does leave me with a couple of spare bits, as I bought a pot, with the plan being to use the other parts from the spare body, but I decided it was easier to just get some extra parts, and leave the other body in tack.

So now we're REALLY close to getting this think playing. Jobs left to do are:
Finish the neck
ReFinish the body.
Add the stickers
Add the machine heads
Bolt it all together.
Hook up the electrics.
Play a gig!

Tuesday, 4 November 2008

Rollin' Rollin' Rollin'


We ARE on a roll.

With the oil finished, a quick spray over with matt laquer left the body looking great and ready to go. It drys really quickly so I was  able to get on and start assembling things.

First off I put on the bridge - primarily to give me a reference point for aligning the neck. With that on there really was no excuse not to fit the neck!!!!! This is the scariest bit, as it's the most expensive component, and it's a one shot deal - drill the holes in the right place or have an off centre neck. I put the screws in the body holes so they were just protruding. Lined everything up, checked it with a long metal ruler, and pressed down making four small indentations. I then took the neck off, and put it back again, lined it up and pressed down. Still only four indentations, so we're good to go....

Tentitivly I drilled pilot holes, to about 1/4", and attatched the neck to the body... It seemed good, so I drilled full depth. At that point I hit a minor hitch. The next size drill bit I had was a fraction too large. It MIGHT be OK, be ideally I need a size down, so the neck is basically drilled, and ready to attach, but it needs a new drill bit to finish it off. Best of all with the neck loosly attatched (actually it felt pretty solid), the bass felt and looked great. Everything seems to line up.

Of course the headstock still needs to be done (and there's no hardware there yet), but with the neck drilled the whole project seems a lot closer to working.

With the body laquered, and the neck drilled, there really was no reason not to keep going and attatch some hardware. The EB pickup looked too good not to add, so in it went (with the help of a little foam to push it up). Strangly the screws that came with it are HUGE - they only have to hold the cover on - but they're the same size as the screws for the neck. I found some others, and it all went on sweetly.

What next... Another scarey job. The pickguard. With the EB in place I was able to check that the template I used to lay everything out was still correct, and fitted around the pickup like it was supposed to. Then I transfered the shape to the pickguard. I was a bit worried about cutting it, but it turned out my jigsaw produced a really clean cut, so I was able to cut out the pickguard to make space for the EB pickup pretty easily. Add a few holes for the controls, and it's done!

Wow - a load of progress.

The bad news is that as I was doing this a couple of white areas appeared in the laquer - I think some moisture must of got in/under it. Fortunarly they're round the edges (where I gave it a quick touch up), and the white areas are flaking off, so a quick touch with wire wool should sort them. I don't think they'll need recoating.

So the body is almost done. All the hardstuff is done, so I just need to wire it all up, strap buttons, bridge cover and add the stickers.

The headstock is more of a challenge - reshape it, refinish it, add machine heads, and nut. Still with the body done, it all feels a lot more reachable.

Monday, 3 November 2008

Skate and Destroy


I'd tracked down all except one of the stickers - the tiny little one on the back.

The letters SAD probably meant Skate and Destroy, a slogan used by Thrasher Magazine in the 80's, but I couldn't find anything even close....

Time to ask for help. A quick post on TalkBass and I had the answer in a few minutes, and here it is...  on a hoodie! Thanks to DrPete we now have a much better idea of what this looks like.

We're not out of the woods yet - this is the only image we have, but it's confirmed as thrasher/Skate&Destroy. Worst case I can clean this up and produce a version, but I'm still followiung up some leads in the hope of getting a better image.

Sunday, 2 November 2008

It's Oil Over Now...


Three quick coats of Danish oil later, and it's looking great. The pics show before and after (and of course you can see the new routing).

That stuff only takes a couple of minutes to wipe on, and a few hours to dry, so it only took a couple of days to get it done.

I could just leave it like this, but as I need to add some waterslide transfers, I'll probably give it a quick spray of matt varnish first.

The finish is far from perfect - particulary when you hold it up to the light and catch the reflections, but from any distance it looks great, and besides this s upposed to be a relic project. Trouble is with the hardware added it looks sooo sweet, I don't know if I'll be able to bring myself to add the stickers...

Wednesday, 29 October 2008

Route 66

The body is now routed out for the extra pickup, and controls!!!!

Now this is a pretty easy job with the right tools... Exactly. The right tools being a router, which would polish it of in a couple of minutes. Instead I tackled it with a hand held powerdrill, and a screwdriver to dig out the scraps. I justify this to myself (apart form the fact I don't own a router) that Billy probably did the original in similar fashion - there's a note on his website about how he had to hoover the bits up from his Mum's front room carpet. Actually hoovering as you go along really does help, as you need to clear out the mess to see what you're doing.

Anyway, I tackled it in a couple of sessions, drilling out the corners first, then some bigger holes, and then bashing at what was left with a screwdriver. It worked OK, but did leave the hole looking like the surface of the moon - quite cool actually. However in a final conscession to using the right tools, I bought a nice new, and VERY sharp chisel, which did a great job of tidying it all up, squaring off the edges, smoothing the bottom of the whole, and then enlarging the whole thing slighly to fit the pickup in.

I actually amazed myself - I'm not the greatest craftsman and had pretty well resigned myself to some parts of the job being a bit rough (that is after all why fender invented pickguards!), but the final pickup route really looks good. It's totally clean, smooth and more or less square. It looks a pretty proffesional job!

Of course the control cavity also needs to be extended to contain an extra jack socket, and an extra pot. Basically the existing three sockets are used up by the P Volume, and the sockets, so we need to add new routing to fit the volume and tone pots for the EB pickup. I've made a paper pickguard template, and marked the control positions on it, so I just drilled through that, and enlarged the cavity from there. As there is not exact size or shape it needs to be, the end result is a little more messy than the pickup route, but should do the job (and it is covered up), so we're all good to go.

Next job is (I think) to oil the body. I eventually decided to try some Danish Oil (mainly Tung) to bring out the grain of the body, and make it look more woodlike. There's still some patches of the old finsh, so it might come out blotchey but I can always sand those out and re-apply if it oesn't work first time. We're not going for a perfect result. I'll probably need to put a thin layer of laquer over the top for the stickers, but I think I've got some acrylic spray somewhere, so I'll just give it a quick coat of that to seal it before I do the waterslides (I think)...

Tuesday, 21 October 2008

Thunderbirds are Go...

Everything is here. The EB pickup arrived yesterday, and looks great - all big, shiny and Gibson-ish. We're all ready to go!

Things are busy at the momment, but I managed to at least do something, so we're officially started. I traced the pickguard onto cardboard, and marked out the cuts that will need to be made for the front pickup, and the extra holes for the controls. I figured it was easist/best to make them on the template. Then I'll be able to transfer it to the scratchplate once it's all checked and tested.

Once the SP template was done, I transfered the pickup cutout to the bass, and checked it against the neck, so that it's all in the right position. The bass is now marked up with all the routing it needs to take the extra hardware.

I've also spend some time thinking about how to finish everything. I need to use some kind of varnish/laquer to protect/attatch the waterslide transfers, so I was considering doing a full nitro finish, but figured that it was a bit overkill - after all the original hasn't any finish. I also wasn't sure it could cover the cuts on the headstock reshape.

The current plan is to use some kind of oil finish (tung?), with a light overspray of acrylic laquer (matte or satin) where it needs it for the logos.

Thursday, 16 October 2008

More bits...

I can't help it. The pickguard, and bridge cover arrived today, so I just had to lay them all out and see what it looked like so far... Pretty classy actually (or at least it would be without the skull sticker on there!). The perloid and the bridge cover look awesome. I even tried the bridge cover on my old P-bass and it looked AWESOME - I may have to get one for it. As far as anyone can remember they're just cosmetic, but they do look sweet.

The pickguard isn't a great match to the body - it's a little small in places, and barely covers the control cavity, but with a little wrangling it should all be ok. I didn't expect the scratchplate to be one of the parts that cause problems, but it's one of the simplest bits to bodge. All the important parts go together smoothly.

The pickups are from an old Warlock - I upgraded it do 1/4 pounders, but they should be ok in combination with the Mudbucker. I've still got a complete loaded body turning up at some point, so I could use the pickups from that, or maybe I'll leave that as it is - I thought I'd strip the second body for parts, but there are only a few bits I can use, so it's probably easier to leave it in one piece.

Wednesday, 15 October 2008

The PostMan Cometh...


It's been about a week since I started ordering stuff, and it seemed like nothing was happening. Finally a whole load of stuff arrived today, and it looks great.

First to arrive was the neck and associated trimmings - which is pretty neat, as they were one of the last bits ordered. Thumbs up to CHGUITARS ebay store. The neck seems really nice, and the "slight marks" which meant I got it cheap are trivial. I'll probably do worse damage the first time I take it to a gig - if it survives that long. They were also good enough to contact me and adjust the order to make sure it all fits together. I got the neck, machine heads, and nut from there and it all works together nicely.

Next to turn up was the body. I got this for less than I had to pay for shipping. It's an old Squier, which unfortunatly means it's ply, but other than that it seems pretty nice. I guess someone decided to sand down a red body, and then discovered it wasn't solid wood. I'm OK with this - it looks just rough enough to pass for a bass that's taken a beating. The ply is only visible at the edges, and from the front it looks great. I might add some darker stain round the edges to hide the layers. It fit's the neck nicely, so we're all good.

Other bits to turn up include some electrical components and a couple of string trees.

But wait... there's a "you were out" card! Actually I was out back in the studio teaching a bass lesson (lots of chromatic scales are sorting out Mike's left hand nicely...), and missed them. A trip to the post office later, and I've got the Hipshot D-Tuner. This is a big item. It was one of the most expensive items on the shopping list - I was lucky enough to get one half price, or it would have been by far the most expensive part. It's also a component that comes in a bewildering range of almost identical versions. The one I found for a good price was the BT-2 "for Fender basses", which I hoped was the right one, but what if I got it wrong?

Turns out the hipshot is a serious piece of machinery, and is a perfect fit to the machine head bushing that came with the tuners I bought. It's all going very smoothly so far.

So everything fits together, most of the main parts are here. Soon we'll be ready to start assembly. The first job is to reshape the headstock to be more Tele like - that's a pretty scary place to start, but it's really just some cutting and sanding... Maybe I'll find time to do that at the weekend.


Monday, 13 October 2008

Stickers


Billy's bass has a number of distinctive stickers on it. Reproducing these was a challenge that I'd need to tackle asap, so lets get it out of the way while we're waiting for the parts to arrive.

The two stickers on the front are pretty similar - a skull logo. putting Skull into google image didn't help much, but searching for the text "Bones brigade" showed we were in skateboard territory. Searching for Skull and Skateboard, got us there pretty quickly. It turns out that the stickers are from the Powell Skateboard makers, and they're associated skate team. It's generally refered to as the Powell Ripper. Maybe that's obvious to a lot of people, but I'm not a skater, so this was a major breakthough.

The coloured skull was pretty easy to get. An almost identical sticker was easilly availble from online skate shops, and ebay. The B&W image was more tricky. Getting close was pretty easy now we know it's the Powell Ripper. It's generally listed as the Powell Winged Ripper, and again stickers are easily available. Trouble is they're COLOUR, and much higher quality that the messed up one on Billy's bass.

My solution was to download the coloured image, and photoshop it to better match Billy's The result isn't identical as I chose not to move the wings (which are higher up on the original), but it looks pretty good, and I don't think I could do as good a job if the wings were moved. It will be printed onto waterslide transfer paper, and sprayed with acrylic varnish.

On the back there's a large red dragon. Now we know Billy's love of all things Powell it was pretty easy to track down the rear sticker as the "Powell Peralta Oval Dragon" - available from all good skate shops.

That leaves one stiker unidentified - a small BW sticker on the back of the bass. The letters S A D are visible, which stands for Skate And Destroy. However thats where we hit a dead end. It appears to be some kind of bat/dragon. Again it's a candidate for a home made sticker, but so far I don't have a good picture of it. If that's the worst problem we have, then I can live with it.

So thats the stickers pretty well covered - two easily purchased, and one that I can make.

Hopefully some stuff should arrive tomorrow.

Shopping

Let's hit EBAY.

First snag is the bridge cover. Strange place to start, but it was on a cheap Buy-It-Now, so that's the first part I grabbed.

For the body, I found a stripped Squier Precision body for $5. Cost me more to ship it! It's ply, which may look pretty bad, but this is a "beater" anyway, and worst case it gives me something to cut into and screw up.

I picked up a second body - it was fully loaded, so that's a bridge, P-Pickup, and wiring sorted. Plus a spare body just in case (tobacco sunburst - may be good to "relic" it). There's a pickguard but it's white, so it can go in the spares bucket.

The pickup wasn't too tough, but I did have to order it form the USA. It's a generic EB replacement, rather the than the Dimarzio models, which will look the part. The DiMarzio's are black, but we need silver.

The neck turned out to be a toughy. A Tele style neck is out of the question - a real one is crazy cash, and finding a copy isn't going to happen. Even finding a cheap used neck was tough, because of the requirement of the maple fretboard. Loads of cheap rosewood fretboards - in fact I'd have considered just picking up a cheap used P if there was such a thing with a maple fretboard.

I finally found a "slight second" new neck from an ebay parts dealer. It's a P-style headstock, so it'll need reshaping, but other than that it's good. I also picked up most of the odds and ends (extra pot, jack, tuners) etc. At this stage I noticed that Billy's bass may have a brass nut. I could have sourced one of these pretty easily, but it wouldn't fit the neck without some cutting. I decided to go with a plastic nut, and maybe add the brass one later on.

The hipshot was going to be a big hit in the budget - no cheapskating options are available, as there's basically only one manufacturer. Fortunatly one came up on ebay, and I got if for half price.

I also bid on a couple of extra bridges - they were basically free, as no one bid on them. I'm not sure which I'll use. It doesn't really matter as the bridge is hidden by the cover anyway. I did consider a bridge you could hook the strings into rather than threading them, which would make life easier with the bridge cover, but I decided to go with something more classic.

That just leaves the pickguard - should be simple to get, though the red shell finish makes it a bit harder. I'll pick one up soon. There was one on ebay, but I figured I'd get one cheaper.

All of this stuff was ordered over the course of the last week. None of it is here yet though. In the end it added up to a bit more than I expected for a cheapskate project - unavoidable and distinctive features that you wouldn't find on a regular bass, like the EB pickup and the hipshot bumped things up quite a bit.

I just hope it all fits together when it does arrive...

Background Research


A big more digging, and we've got most of the info we need:

For anyone who cares it was originally a Tobacco Burst. Not that you can tell, so I guess that's not important now!

To make things a little easier, someone in Japan made a really nice copy, and posted some pictures. Of course they're not the original, but they've done some good research, and their pics are a lot clearer than the ones of the real bass.

in additon to the standard components we're going to need:
a body without any finish.
A Bridge cover
Red Tortoise Shell pickguard
EB Pickup
Hipshot
A whole load of stickers.

Ideally we should use a second black pickguard to fill in the jack socket area (and bolt it down with some washers), but we can sort that later.

I've not found definitive info on the controls for this bass, but it's safe to assume they're the same as the Yamaha Attitude. From front to back that gives us EB-Volume, EB-Tone, P-Volume, and then two jack sockets.

Time to go shopping.

The Wife

So here it is. The original "wife". This is the Bass Billy used in Talas, and in fact pretty much every gig he did until he joined the Dave Lee Roth Band, and signed with Yamaha. THIS we can build!

Billy's website tells us he got this Fender Precision around 1971, and swapped the neck out shortly afterwards for a 68 Tele Bass neck. He also added an EB style pickup, routed to a seperate output jack (in 1972), and scalloped the upper frets in '85.

Still a lot to figure out, but not a bad place to start.

Lets start buying some parts!

Lets build a bass!


The release of the new BB series Billy Sheehan "signature" started me thinking... Though I LOVE the Yamaha BB series, the BB714BS is a real letdown. It's got a "mudbucker" pickup added, but it's nothing like Billy's original BB3000. For a start it's not available in pink, lacks a maple fretboard, hipshot d-tuner, stereo outs, scalloped frets and even the pickups aren't the real Will Powers. It isn't even listed on his website!


That set me thinking if it would be possible to build a real BB series BS Signature... And I concluded it's NOT. Bah! At least not practically. For a start where are you going to get a BB body in pink? You could try to use a P-Body (which you can get in pink), and live with the slightly wrong shape, but the BB's are rear-routed, without a pickguard, so that's a non-starter. You'd need to respray a real BB body, and they're not cheap.

Even if you've got a body you then need a maple fretboard - Yamaha only do those on the Attitude, so you need another neck, reshaped to the right headstock, and again resprayed pink.

All that's going to add up to a lot of cash, and work that's not easy to do...

We need a plan B: Billy's original Fender Precision!!!! aka "the Wife".